

We are reader supported. When you purchase through links on our site, we may earn an affiliate commission. Also, as an Amazon affiliate, we earn from qualifying purchases.
I must admit that cooking sushi rice is not the most exciting part of making sushi, but it’s an essential constituent nevertheless. The sushi rice, or sushi-meshi or Shari in Japanese, can make or break your sushi roll. It should be sticky enough to make nigiri sushi but not too mushy or too hard. It must have just the right texture to hold everything together.
So, what’s sushi rice? It is the steamed short-grain Japanese rice (see my recommended rice) flavored with vinegar-based seasonings, and only this type of rice works best for making sushi. Some rice companies outside Japan label short grain rice as ‘sushi rice.’ As a beginner, it can be tricky for you to understand the difference between the two.
Sushi rice, in the real sense, refers to cooked short-grain Japanese rice seasoned with vinegar, sugar, and salt. Some fitness conscious individuals may prefer using brown rice in the place of short-grain rice, but this is not common in Japan.
Contents
Why is short-grain Japanese rice best for making sushi?
If you wish to attain the authentic taste, short-grain Japanese rice works best for making sushi. The flavor and consistency of short-grain rice are different from other varieties like jasmine rice, long-grain rice and so on. It has a higher content of moisture compared to others. It is characterized by a unique texture and stickiness that contributes to the pleasant taste of traditional sushi.
Let’s take a look at how to make sushi rice in a rice cooker.
Cooking Rice In A Cooker
Ingredients:
- 3 cups of short-grans rice
- 3.6 Cups of Water
- 6-8 Tablespoons of Rice Vinegar
- 2 Tablespoons of Sugar
- 2 Teaspoons of salt
Or You can use a sushi roll Calculator. Simply select how many rolls you are going to make.
To produce perfectly cooked Japanese rice, you need to rinse the rice with water for a few times. Put the grains in a colander style sieve with small holes so that grains do not pass through.
Hold the sieve under a running tap and repeatedly wash the rice until the starch comes out and the water runs out clean after washing.
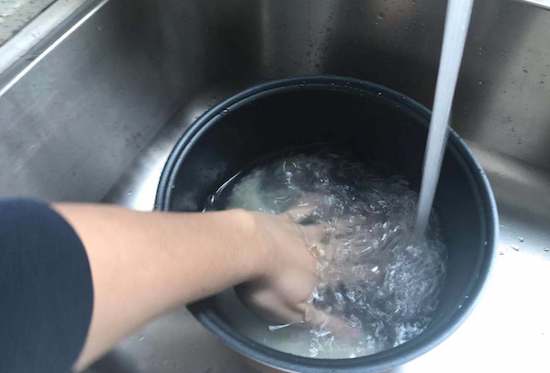
Use your other hand to gently stir and rub the grains so that the powder coat is removed. Don’t apply too much pressure or it may break the grains.
Once washed, keep the rice aside and set up the rice cooker. Now, add the rice into the cooker (click to see my favorite Japanese cooker). Make sure you don’t add more than the capacity of the rice cooker. One cup of raw rice can turn into two cups of rice once cooked, so consider this ratio before adding rice into the cooker.
Follow the directions of the appliance to add the required amount of water to the rice cooker. You may use the standard measurements or use the cup included with the rice cooker. There will be marks inside the cooker to indicate the water levels. (For 3 cups of rice, add water up to 3.6 cups mark)
After you add water and rice to the cooker, plug in the appliance and switch it on. Each brand or model comes with different types of settings, so remember to consult the user manual when in doubt. Some rice cookers may have levels marked inside for cooking sushi rice.
Now place the rice cooker on an even and sturdy surface on the kitchen counter. You must remember to keep other objects away because heating elements always pose a potential risk.
Close the lid of the rice cooker and let the rice cook. While you don’t need to stir the rice while it cooks, you will need to pay attention to the time. The time needed may vary slightly depending upon the model of the cooker. On an average, it takes about 16 minutes for the rice to cook thoroughly.
Some rice cookers may come with a pre-set timer for sushi rice or an automatic shut-off feature. If not, make sure you set the timer as directed on the rice package or follow the rice cooker instructions. Leaving the rice for too long will overcook the rice and turn it gooey.
Cooking Sushi Rice In A Pot
You may alternatively cook sushi rice in a pot on a stove. I prefer this style of cooking because it allows you to keep checking on the rice as it cooks. Rinse the rice thoroughly as mentioned above to remove the powdery coating over the grains.
Transfer the measured amount of soaked rice into a pot and add 120% of water. So, for every 100 grams of rice, you will need to add 120 ml of water. Cover the pan with its lid, place the pot over a stove on medium heat, and bring it to boil. Make sure you do not over boil the rice.
Bring down the heat to a lower setting and let it simmer for 15 minutes. If you can find kombu, I would suggest that you add it to the rice for a more traditional flavor. It can also be added to the rice cooker. When the rice is ready, turn off the heat and let the rice rest for 10 minutes with the lid on.
Let the rice cook in its own steam after you turn off the stove to ensure that the rice feels firm to touch but is not crunchy inside. The cooked rice will be sticky but each grain should retain its shape.
Pro tip: If the rice turns too soft or remains too dry on your first attempt, remember to adjust the amount of water next time. If it’s too gooey, use less water and if it’s too dry, add some more water. Don’t try to cook the rice once again to fix the issues as this will ruin the rice.
Seasoning Cooked Rice
Whether you cook rice in a rice cooker or use a pot, the next step is to season the cooked rice to prepare vinegared sushi rice. You may make the seasoning while the rice is still cooking. Mix the items for seasoning to have it ready by the time the rice is ready.
For the seasoning, you will need vinegar, sugar, and salt. Take a small bowl and add half a cup of rice vinegar. Now add two tablespoons of sugar and two teaspoons of salt. Stir the ingredients to ensure that the solids dissolve in the vinegar.
The recommended ratio for vinegar, sugar, and salt is 8:2:2 However, you may adjust the seasoning as per your preferences to get a stronger or weaker taste. If you need a quick solution, you may buy the pre-mixed sushi vinegar available at any Asian grocery store.
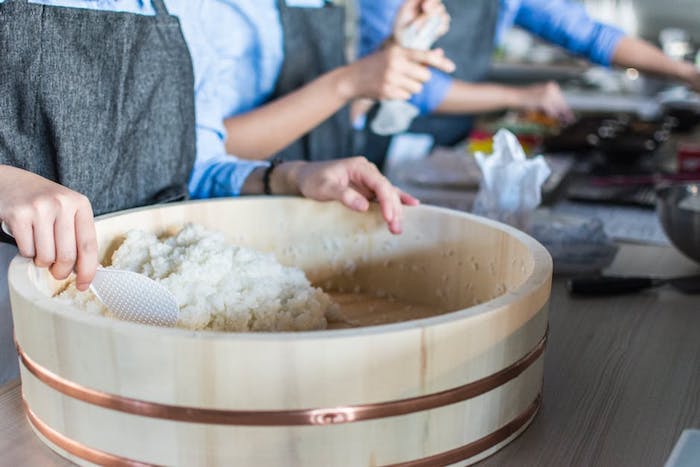
To add seasoning to the rice, you must first transfer cooked rice into a large bowl. I would recommend a large wooden bowl with a flat surface to help the rice cool off quickly. Moisten the walls of the container to prevent the rice from sticking. Now transfer rice to the bowl and use a wooden paddle to spread it.
When the rice has cooled down a bit, but still warm, pour the vinegar mixture slowly to cover the entire content. You may use a wooden spatula or rice paddle to stir the rice gently and ensure that every grain is properly coated with the vinegar mixture. Move the spatula gently to ensure that you don’t break or smash the rice.
Tips To Make Your Sushi Rice Look Glossy And Fresh
When you mix cooked rice with the vinegar seasoning, blow air over the rice using a fan or hair dryer set on cool status. This will dry up extra water and help the rice cool off quickly. It also adds shine to the rice and keeps it from turning mushy.
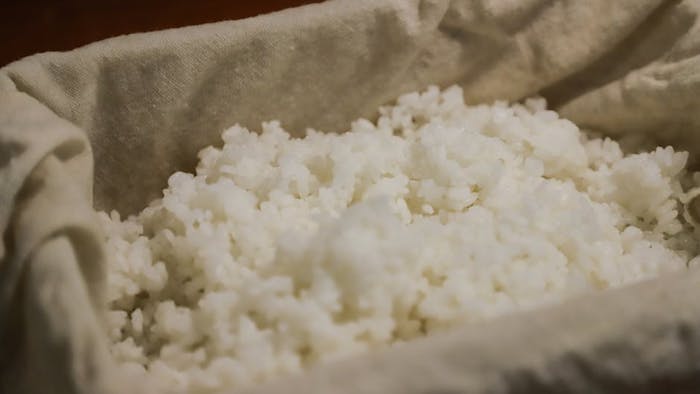
Sushi rice is properly seasoned and ready to use when the surface no longer feels wet or slippery. Spread out the rice over the bowl and cover it with a damp towel to keep it soft and fresh until you are ready to use.
Drying out the sushi rice too much can also make it difficult to use in rolls. Avoid refrigerating the rice and make sure you cook rice right before you are ready to prepare dinner.
Time plays a vital role in making sushi, and slight delays can spoil the texture. I recommend you to use a smartphone or kitchen timer to keep a track of the soaking and cooking times.
To make perfect sushi rice, always use 15% more water than the volume of rice used. For example, to cook one cup of short grain rice, you will need a little more than a cup of water. Also, remember to bring the water to boil before adding soaked rice to it.
Why Is Cooked Rice Seasoned With Vinegar?
You may wonder why it is necessary to seasoned cooked rice with vinegar. Why not use it as it is? Well, the answer lies in history and goes back to the origin of sushi rice. The term ‘sushi’ literally means sour flavor, and it derived its name from an ancient tradition.
In the past, the Japanese wrapped fish in fermented rice to preserve it for a long time. When it was time to eat the fish, the fermented rice was discarded. Somewhere between 1300 to 1500s, the Japanese slowly stopped using fermented rice and started adding vinegar to rice.
Down the line, they realized that vinegar not only helped preserve the fish but also made the rice taste great. This led to the tradition of eating fish and vinegared rice together, which later evolved into a fine delicacy called sushi.
As technology developed and refrigerators were invented, there was no need to preserve the fish with vinegared rice anymore. They started freezing raw fish to keep it fresh, and the sushi rice retained the same centuries-old flavor!
10 Common Mistakes To Avoid When Making Sushi Rice
There’s a thin line between perfect and not-so-perfect sushi rice. While the process looks easy, slight negligence or mistake can spoil the overall flavor. If the rice is overcooked or remains undercooked, you won’t be able to make perfect sushi rolls with them. So, here are some common mistakes to avoid:
#1. Choosing a different variety of rice such as long-grain or dark rice can make the cooking process difficult and leave a lot to be desired in the cooked rice in terms of flavor and taste.
#2. Many people choose to skip rinsing the rice to quicken the process. Not removing the powdery coating over grains will make the cooked rice feel too starchy.
#3. Not cooling (slightly) rice before adding vinegar seasonings will not yield the right texture. It is important to spread out the rice on a larger bowl to let excess liquid evaporate.
#4. Adding salt to the water while cooking rice is not recommended. The vinegar seasoning already has salt in it so adding salt while cooking may make the sushi rice too salty for your taste.
#5. Stirring rice frequently while cooking in a pot is a strict no-no. It can break the grains and spoil the texture.
#6. Cooking rice in a pot without the lid is another common mistake, as this will keep you from achieving the right temperature. Unless you cover the container, the steam will escape, and the rice will take too long to cook.
#7. Cooking rice too soft or too hard will make it tough to make perfect sushi rolls. Maintaining the right consistency is important. Soft rice will fail to give a firm shape to your roll, and hard rice will not stick well.
#8. Adding vinegar seasoning to cold rice will not yield the same results. To get the perfect flavor, you must add the vinegar seasoning when the rice is still hot.
#9. Some people tend to smash rice using a stainless steel spoon when mixing seasoned vinegar to it. Always use a wooden spatula and move the rice gently without smashing them.
#10. Storing sushi rice in the refrigerator is another common mistake. Measure correctly and only cook enough rice you can consume in one session because refrigerating rice for next day will spoil its texture.
Related Article: How To Use Leftover Sushi Rice (Besides Making Sushi)?
How To Make Sushi Rolls (Really) Tight
For tight sushi roll, the rice should have the right texture, not too soft or too hard. If you try to make the maki too tight with dry rice or use a thick layer of rice, this will spoil the taste.
First, you need to place a bamboo mat or makisu on an even surface and then wrap it with a plastic sheet to ensure that rice does not stick to the mat. Now put a Nori sheet on the plastic and take a handful of rice to spread it out evenly to both sides.
I would recommend that you use about 150 g (5 oz) of cooked sushi rice to get a tight roll or you may use the sushi making kits I recommended to make it easier. Make sure you do not cover the Nori sheet completely. Leave an area of 0.75 inches (2 cm) on both the sides of the sheet.
After you apply a layer of sushi rice on the Nori sheet, use a bamboo mat or makisu to give a proper shape to the roll. Line up the edge of the Nori sheet with the edge of the mat and start rolling as you work your fingers from the middle to get a tight roll.
The California roll, also known as the inside-out style, has sushi rice on the outside. As the sushi rice is sticky, it sticks to the surface of Nori as you flip it over. You can continue adding fillings (Ideas for sushi roll fillings) to the other side of the Nori. Read on if you are interested in how to make California rolls
Making perfect rolls require a bit of practice, but as you gain experience, you will be able to make sushi rolls that are tight enough to stay in shape. When the layer of sushi rice stays firm and holds the fillings together, it becomes easier to cut the roll into neat slices.
Related Questions
What is the difference between rice vinegar and white vinegar?
While rice vinegar and white vinegar may look similar, they differ in the way they are prepared; items used to ferment them, their purpose, and the culture in which they are used. The rice vinegar has a sweet and delicate taste, while white vinegar is comparatively sour and harsh.
Rice vinegar is made by fermenting rice, and it is mostly used in Chinese and Japanese dishes. Outside Asia, rice vinegar is called sushi vinegar, and it is used with salt and a little sugar for seasoning sushi rice.
White vinegar is made from oxidized grain alcohol and used as seasoning. Although it is sour and rather unpleasant to taste, it is widely used as salad dressing and marinade mixes in the western countries.
Can I use medium grain rice for making sushi?
Ideally, sushi rice should be made with short-grain Japanese rice because it is sticky and has a lot of moisture. However, if short-grain rice is not available, you may use medium grain varieties such as Calrose rice or California rice that are suitable sushi. These varieties have starchy grains that help in holding the rice together. While the taste will not be authentic, you will still be able to make a decent sushi roll when you are in a hurry.
Can I use long grain rice for making sushi?
No, please don’t attempt making sushi rolls with long grain rice or you will be disappointed with the results. The long grain rice variety is the driest of all types. It is firm and grainy in texture. It also lacks moisture needed to stick rice together to form a roll.
Related Article: Can You Make Sushi with Brown Rice?
Is sticky rice same as sushi rice?
While sushi rice has a sticky nature that helps it glue to the Nori sheet, excessive stickiness can spoil the texture. Some varieties of glutinous Japanese rice may be suitable for other types of dishes, but they are too sticky and clumpy to be used in sushi rolls.
Related Article: How to Make Sushi Rice More Sticky?
The Final Words
It doesn’t take a master’s degree to learn the art of making perfect shari for your sushi rolls. All you need is a lot of practice and some patience. Making sushi at home is not only an enjoyable experience, but it also saves money. However, you need the right items to get a desirable result!
So, head to an Asian grocery store near you to find the ingredients needed to make perfect sushi rolls. If you don’t have access to an Asian store, buy the items online. I recommend that you also get a few sushi-making essentials such as a sharp Japanese knife, plastic sheets, and a bamboo mat.
Follow the steps mentioned above to make sushi rice in a cooker or a pot, and experience the joy of cooking perfect rice. As they say in Japanese, Itadakimasu!
Comments
Pingback: 15 Easy Sushi Recipes For Beginners - Easy Homemade Sushi
Pingback: How To Make Dragon Rolls (With Vegan Recipe) - Easy Homemade Sushi
Pingback: how much sushi rice to make per person? - Easy Homemade Sushi
Pingback: How To Make Godzilla Roll (Recipe)? - Easy Homemade Sushi
Pingback: Best Rainbow Roll Sushi Recipe: An Ultimate Guide - Easy Homemade Sushi
Pingback: Best Avocado Roll Recipes: All You Need To Know - Easy Homemade Sushi
Pingback: Nigiri sushi: all you need to know - Easy Homemade Sushi
Pingback: Sea Urchin Sushi: The Ultimate Guide - Easy Homemade Sushi
Pingback: How To Make Caterpillar sushi Roll? - Easy Homemade Sushi
Pingback: What Are Fish Eggs On Sushi Called? - Easy Homemade Sushi
Pingback: Easy Natto Maki Recipe (Japanese Fermented Soybeans) - Easy Homemade Sushi
Pingback: Does Sushi have to have Rice? - Easy Homemade Sushi
Pingback: What Is Inari Sushi And How To Make It A Home - Easy Homemade Sushi
Pingback: 7 Ways To Make Sushi Without Seaweed (Nori) - Easy Homemade Sushi
Pingback: What Is Toro And How To Make Toro Sushi - Easy Homemade Sushi
Pingback: What is the best Nori for Sushi? - Easy Homemade Sushi
Pingback: Proper Way to Eat a Hand Roll [Temaki] - Easy Homemade Sushi