

We are reader supported. When you purchase through links on our site, we may earn an affiliate commission. Also, as an Amazon affiliate, we earn from qualifying purchases.

I know the traditionalists will hail nigiri as the most authentic type of sushi passed on to us from the Edo period, but the sushi rolls have broken all records when it comes to popularity. The sheer diversity of rolls and the ability to hold so much flavor within the bite-sized pieces make them a favorite of the masses.
Unfortunately, sushi dinner at a high-end Japanese restaurant doesn’t come cheap and understandably so because sushi-grade fish is expensive and then you also pay for the chef’s expertise, the ambiance of the restaurant, etc. A satisfying family dinner can set you back with about a hundred dollars!
If it’s a rare occurrence for your family to dine out at a sushi restaurant then maybe you can handle that gigantic bill once in a while. But, if you are like my family that loves sushi so much that you want to have a sushi dinner every week, once or maybe twice then it pays to learn how to make different sushi rolls.
Once I started making sushi rolls for my family at home, I realized there are so many hidden benefits to it. I can select my own fillings, get partial with the ingredient that I love most, repeat a salmon or tuna roll as many times I like and use the leftovers for a delicious breakfast next day.
Today’s post will focus on the different types of sushi rolls and how to make them at home so that you eat as much as you like without bothering about the skyrocketing price.
Contents
Things To Get From The Grocery Store
Before I start telling you how to make different sushi rolls at home, let me give you a quick briefing on the things you will need to buy from the grocery store. There are a few items that you can keep in the pantry or refrigerator if you make sushi often, but you will still need a few fresh supplies from the market.
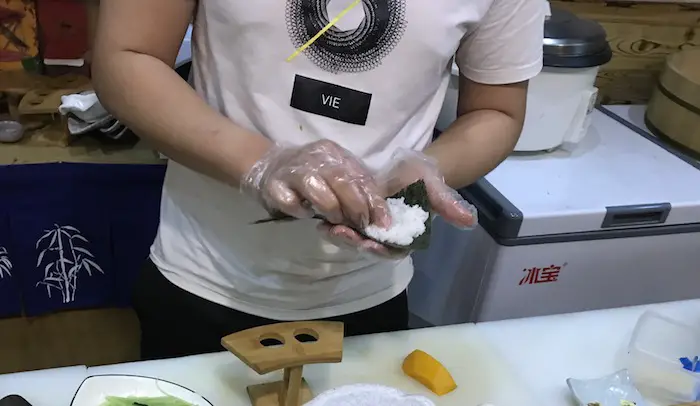
Sushi rice: This is the most basic ingredient you will need to make any type of sushi and the best variety is the short-grain Japanese rice (see my reviews). Don’t mistakenly buy any other variety of rice (for example long-grain) because it will not be sticky enough to make sushi. Ask for the newest crop at any Asian grocery store.
Vinegar: The authentic flavor of sushi rice comes only when cooked rice is mixed with vinegar. In the grocery store, you will find bottles labeled as ‘sushi vinegar’ to help beginners choose the right type. If someone in the family is intolerant to gluten, get the rice vinegar instead.
Soy Sauce: Any Japanese cuisine is incomplete without soy sauce but buying this condiment can be slightly tricky for a beginner. There are several brands selling different types of soy sauce so it can be confusing. I would suggest that you look for terms like naturally-made and avoid the ones that are chemically processed.
The Japanese soy sauce, also known as shoyu is clearer and thinner than its Chinese counterpart. It is also less salty. If you want to do gluten-free cooking, choose tamari – a Japanese soy sauce made of only soybeans, no wheat. Remember to check the ingredients because sometimes tamari may contain wheat.
Nori sheet or seaweed: Although this is a much-undervalued ingredient, I feel this is the soul of sushi. Can you imagine a roll without this dark green cover? I know there’s uramaki but it still has nori hidden under the sushi rice, so you still get the flavor.
If you are among those who can’t stand the taste of nori, you may try other substitutes like soy paper or rice paper. I would request you to keep trying to acclimatize your tastebuds to the flavor of nori because sushi is not the same without it.
Sushi-grade fish: To make a salmon or tuna roll, you will need to buy sushi-grade fish from a reputed local fishmonger. If you can’t find high-quality fish at the local market, check the supermarket or grocery store. As a last resort, you may consider buying online from trusted sites like Catalina Offshore Products.
Vegetables and fruits: While sushi is mostly associated with raw fish, there are different types of sushi rolls that contain online vegetables and fruits. This is good news for my vegan and vegetarian friends because there are a plethora of options available for fillings. Examples are avocado, cucumber, carrots, mango, strawberry, spinach, asparagus, bell pepper, cabbage, and so on.
#1.Temaki Rolls
I know this is not the most traditional style of sushi rolls but as a beginner, this gives you a good start. Rolling maki sushi requires some skills and you need to practice to learn the technique. Until then, why not save the frustration for later and enjoy making temaki rolls instead.
While they are still called rolls and contain almost the same ingredients you can find in any traditional sushi roll, the temaki rolls are several times easier to make at home. It’s so simple that even kids can take part in the fun and enjoy making rolls for dinner.
I have created an article that contains in-depth information on temaki and different recipes you can try at home. Here’s a quick tutorial to help you make a simple temaki roll at home.
What you will need:
- 2 cups of seasoned sushi rice
- Nori cut in half
- Sushi-grade tuna or salmon
- Ikura (salmon eggs)
- Lettuce
- Kaiware sprouts
- Green shiso
- Mayonnaise
Instructions
Place the half nori sheet on a plain surface, rough side up and place a large spoonful of vinegared sushi rice (see how to make sushi rice) over the left side.
Moisten your fingers and slightly press the rice to spread it on the left side of the nori sheet. Now, arrange all the fillings over the sushi rice diagonally, most of the fillings should be towards the top.
Put your hand below the bottom left corner of the nori sheet and roll to form a cone shape. Continue rolling until you wrap the entire seaweed around itself. Seal the edges with a few drops of water.
Eat immediately because leaving it rolled for too long will make the nori sheet soggy and spoil the shape.
Method 2 For Making Temaki Rolls
Another method of making a temaki roll is using only a quarter size of the nori sheet. Hold it in your hand, shiny side down and spread a thin layer of sushi rice to cover the entire area, leaving a small gap along the edges.
Sprinkle toasted sesame seeds over sushi rice and arrange the fillings diagonally in the middle of the seaweed.
Bend your hand slightly and tuck the ends to make a cone shape. Squash a kernel of rice and use it to stick the edges. Serve.
Method 3 For Riceless Temaki Rolls
If you wish to cut back on carbs, go riceless while making temaki rolls. You can keep the other ingredients same and just remove seasoned rice from the list.
Place a quarter size of nori sheet on the table, arrange the fillings (you can pile up some extra fillings to compensate for rice) diagonally in the middle.
Now make a cone shape and seal the edges with a few drops of water. Riceless nori will not get soggy soon but I would still suggest you to eat immediately to enjoy the crispy flavor.
#2. Hosomaki Sushi Rolls
This is the most traditional style of sushi roll you get at the restaurants. It usually comprises of 1 or maximum 2 different fillings and rolling is easy. I would recommend that you buy a few sushi making tools such as a bamboo mat and a sharp sushi knife for easy cooking.
If the first few attempts at making restaurant-style sushi rolls do not go as expected, do not lose heart. You may not be able to achieve that compact form, but your sushi roll will still taste as good because you have all the ingredients in place.
I know some people how have tried nth times and still find it difficult to get a neat roll. If you lack sushi rolling skills big time, I suggest that you get one of the smart sushi kits available in the market. These kits come with beautifully designed tools that can make rolling sushi a child’s play.
What you will need:
- 2 cups of seasoned sushi rice
- Nori sheet
- 1 Japanese cucumber, cut into half and sliced into thin strips
- Sushi-grade Salmon or Tuna, cut into thick strips
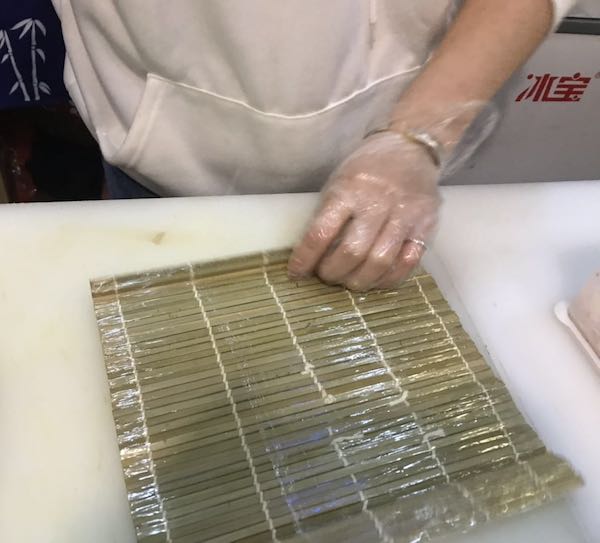
Put the bamboo mat on the table and cover it with a plastic sheet. Keep half of the nori sheet on the covered sushi mat, rough side up.
Take half a cup of seasoned rice and spread it over the Nori, leaving a 1-inch gap on top, the side away from you.
Now, add the fillings towards the middle of the Nori sheet and arrange them lengthwise on the sushi rice, to cover the length of the nori sheet.
First, keep the raw fish slices, then add a few cucumber strips for a crunch taste. You may use different types of fillings such as avocado, mango, bell pepper, tofu, shrimps, and so on.
Now put both thumbs below the bamboo mat and roll with the help of other fingers. Lift the mat along with the nori sheet and fold it over the ingredients, keeping them intact.
Tuck the first edges of the seaweed into the roll and remove the sushi mat as you continue to roll further.
Apply gentle pressure to tighten the roll as you go to ensure that the fillings don’t fall out. Roll it back and forth to get a compact cylinder and then seal the edges by moistening with water.
Let the sushi roll sit for a minute before you cut it. Now, take a sharp knife, moisten the blades so that rice does not stick on it and cut the roll into 6-8 pieces. Serve with soy sauce, wasabi, and pickled ginger.
#3. Futomaki Rolls
In English, it can be translated as ‘Fat roll’ because many ingredients go into it making it fat. As there are quite a number of fillings inside, the nori sheet is rolled along its width to keep them together, so you get a fat and short roll.
What you will need:
- 2 cups of vinegared sushi rice
- Sushi-grade salmon, cut into strips
- Spring onions or scallions
- Avocado, pit removed and cut into thin slices
- Half Japanese Cucumber, peeled and cut into thin strips
- Tamagoyaki (sweet Japanese egg omelet), cut into strips
- Imitation crab sticks (surimi), cut into halves lengthwise
Instructions
Put a bamboo mat on the working surface and cover it with a cling film. Now, keep half Nori sheet in a vertical position as you will be rolling along the width.
Take a medium ball of vinegared sushi rice and spread it over the nori sheet, leaving about a one-inch gap on the other end of the sheet.
Arrange the fillings over the sushi rice, towards your side. First, keep the fish, then surimi, tamagoyaki, cucumber, avocado, and spring onions.
Now put your thumb under the bamboo mat and start rolling along the width to make a short, compact, and fat roll.
As this roll has several fillings inside, you must apply gentle pressure all along to make a compact and tight roll so that the ingredients don’t fall apart.
Let it sit for a while and then cut the roll into 4 pieces with the help of a sharp knife. Remember to moisten the blade to get a smooth cut. Avoid making cutting the roll into thin slices because it will be difficult to retain the shape. Serve with soy sauce, pickled ginger, and wasabi.
#4. Uramaki Roll
This is the inside-out style of sushi roll wherein the nori sheet is hidden below the layer of rice. California roll was probably the first type of inside-out roll created around the 1960s to lure the westerners who did not like the appearance of dark green nori. They, however, did not mind the taste and this was what made chef Hidekazu Tojo come up with the idea of hiding nori beneath the rice.
What you will need:
- 2 cups of seasoned sushi rice
- Nori sheet
- Imitation crab sticks (Surimi), cut into halves
- Japanese cucumber, cut into thin strips
- Avocado, pit removed and finely sliced
- Toasted white and black sesame seeds
- Finely chopped Parsley
Put the plastic-covered bamboo mat on the kitchen table and keep the nori sheet over it, rough side facing you.
Now, take half a cup of seasoned sushi rice and spread it over the seaweed, leaving half-inch gap on all sides. Sprinkle the toasted white and black sesame seeds on the rice.
Press gently with your fingers to ensure that the rice sticks to the nori sheet. Flip over the nori so that the rice part faces downwards.
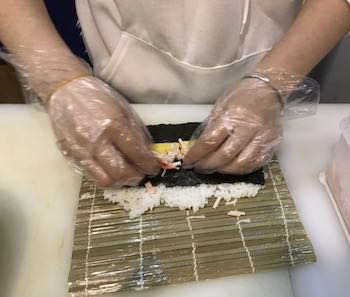
Now, arrange the fillings over the seaweed (towards your side), cucumber strips go first, followed by crab sticks and avocado. Some common options for uramaki rolls are as follows:

- California roll: cucumber, avocado, imitation crab stick
- Philadelphia roll: smoked salmon, cream cheese, cucumber
- Butterfly roll: cooked eel, imitation crab stick, and cucumber, topped with avocado slices
- Tempura roll: Shrimps tempura, cucumber, avocado
Place your thumbs under the edge of the bamboo mat (begin from the side towards you) and start rolling. Lift the bamboo mat and cover the entire fillings, tuck in the roll, remove the mat and continue rolling until you reach the other end.
Make sure the rice along the edges sticks to the nori to seal the roll. Use the bamboo mat to tightly hug and shape the uramaki roll one more time so that the ingredients don’t fall apart.
Now, carefully remove the plastic sheet and roll the uramaki on a plate containing finely chopped parsley to coat it completely. Wet the blade of a sharp sushi knife and cut the roll into 6-8 pieces. Serve with pickled ginger, soy sauce, and wasabi.
Related Questions
Where can I buy sushi kits for making rolls?
You can buy sushi kits online from Amazon. Some may include just the equipment while others come with essential supplies to be used in sushi. Read my unbiased review on the 10 best sushi making kits and also take a look at the customer reviews before buying a kit that suits your needs.
How long can sushi roll last in the fridge?
Freshly made sushi roll can last for about 24 hours in the refrigerator and eaten without risking your health. However, saving sushi leftovers beyond 24 hours can greatly compromise the quality of sushi. For example, sushi rice hardens, loses flavor, and nori becomes soggy.
Why is it important to make perfect sushi rice?
No matter what type of sushi roll you make, the perfect form greatly depends on the texture of sushi rice. It should not be too sticky or chewy. Let the rice cool down to room temperature before you start rolling. I have created an article to help beginners learn how to cook perfect sushi rice in cooker or pot.